Get Started
Welcome to the Nuheat OpenAPI documentation
The Nuheat OpenAPI delivers access for 3rd Party developers to integrate with the Nuheat thermostats.
To gain access to the API, first you must contact our support department to get access to a ClientID.
Request access to the API
Swagger documentation
To make your life easier when getting started developing against the API, we have implemented Swagger as our Endpoint and Model documentation tool.
This allows you to explore and test the API right in your browser, with our included test client.
 Go to swagger now!
OAuth2
The Nuheat OpenAPI uses OAuth2 and OpenID-Connect as the Authorization methods to the API.
OAuth 2 is an authorization framework that enables a service to grant 3rd party applications access to obtain limited access to a users account via a HTTP service.
This protocol allows third-party applications to request limited access to an HTTP service, either on behalf of a resource owner or by allowing the third-party application to obtain access on its own behalf.
Access is requested by the client, which can be a website, desktop application or a mobile application.
Discovery document
As part of the OpenID Connect standard, a discovery document is available to get an overview of the various endpoints and configurations for the Nuheat Identity(OAuth2) Server.OpenID Discovery document
OAuth2 concepts:
Grants:
describes a number of grants (“methods”) for a client application to acquire an access token.
Scopes
provide a way to limit the amount of access that is granted to an access token. It is a lists of identifiers used to specify what access privileges are being requested.
Claims
are name/value pairs that contain information about a user. Profile claims are included that ensures that the request for the user’s info was made using a token that was obtained with the profile scope.
Read more about OAuth 2.0 and OpenID Connect.
Tokens:
Tokens are issued from the OAuth2 server to provide access to the system. Three types exist:
- id_token: identity information about the user is encoded into the token.
-
access_token:
used as bearer tokens, meaning that the bearer can access authorized resources without further identification.
- Expiration: 1 hour
- These tokens usually have a short lifespan (dictated by its expiration) for improved security. When the access token expires, the user must authenticate again to get a new access token limiting the exposure of the fact that it’s a bearer token. They last about an hour and cannot be revoked, once issued.
-
refresh_token: used to obtain new access tokens. These will be long-lived while access tokens are short-lived. This allows for long-lived sessions that can be killed if necessary.
- Expiration: 15 days
- Refresh tokens extend the connection to the users account, while still allowing revokeability. This allows an authorized application to get a new access token without the users interaction. If the user has revoked access to the 3rd party application, the refresh token is no longer valid. Refresh tokens last about 15-30 days.
Grant types/flows
The Nuheat OpenAPI allows the following grant types:Implicit
The implicit grant type is optimized for browser-based applications. Either for user authentication-only (both server-side and JavaScript applications), or authentication and access token requests (JavaScript applications).
In the implicit flow, all tokens are transmitted via the browser, and advanced features like refresh tokens are thus not allowed.
- ClientID
-
Scopes
openidopenapi
Read more about Implicit Flow here.
See code examples at Identity Server Site for server-side apps and Javascript Clients, also see OAuth0 docs.
Authorization Code
Authorization code flow was originally specified by OAuth 2, and provides a way to retrieve tokens on a back-channel as opposed to the browser front-channel. It also support client authentication.
While this grant type is supported on its own, it is generally recommended you combine that with identity tokens which turns it into the so called hybrid flow. Hybrid flow gives you important extra features like signed protocol responses.
- ClientID
- ClientSecret
-
Scopes
offline_access- [Optionally required] Add this if you need to get a refresh tokenopenidopenapi
Read more about Authorization Code Flow here.
See code examples at Identity Server Site with Microsoft.AspNetCore.Authentication.OpenIdConnect and OAuth0 docs.
Hybrid
Hybrid flow is a combination of the implicit and authorization code flow - it uses combinations of multiple grant types, most typically code id_token.
In hybrid flow the identity token is transmitted via the browser channel and contains the signed protocol response along with signatures for other artifacts like the authorization code. This mitigates a number of attacks that apply to the browser channel. After successful validation of the response, the back-channel is used to retrieve the access and refresh token.
This is the recommended flow for native applications that want to retrieve access tokens (and possibly refresh tokens as well) and is used for server-side web applications and native desktop/mobile applications.
- ClientID
- ClientSecret - In the backchannel request
-
Scopes
offline_access- [Optionally required] Add this if you need to get a refresh tokenopenidopenapi
Read more about Hybrid Flow here.
See code examples at Identity Server Site and OAuth0 docs.
Which grant type / grant flow should I choose?
Flow Features
| Authorization Code | Implicit | Hybrid | |
|---|---|---|---|
| All tokens returned from authorization endpoint | |||
| All tokens returned from token endpoint | |||
| Tokens sent via user agent | |||
| Client can be authenticated (e.g. using client secret) | |||
| Can use refresh tokens | |||
| Communication in one round trip | |||
| Most communication server-to-server |
Response Types by Flow
| Flow | Response Types |
|---|---|
| Authorization Code | code |
| Implicit | id_token |
| Implicit | id_token token |
| Hybrid | code id_token |
| Hybrid | code token |
| Hybrid | code id_token token |
Tables adapted from OpenID Connect 1.0 Core Specification.
Scopes
OpenAPI (openapi)
The OpenAPI Scope, allows access to the OpenAPI on behalf of the authenticated user.OpenID (openid)
Required by the OpenID standard.Profile (profile)
Optional - It is possible to call the OpenID Profile endpoint, and get a few claims about the user. We advise to use the OpenAPI’s GetAccount endpoint instead.Offline Access (offline_access)
Required if you want to receive a refresh token.Claims
The Nuheat OpenAPI doesn't include many claims in the access token and id token, and the access token itself is more or less only relevant as a bearer token to be sent to the API.
-
Subject (sub)
- Contains the "subject" of the access_token, in our case it contains the unique userId of the current user.
-
Not before (nbf)
- Defines that the token is not valid before this time (seconds since Unix Epoch)
-
Expires (exp)
- Defines that the token is valid until this time (seconds since Unix Epoch)
-
Issuer (who created and signed the token) (iss)
- Defines who issed the token.
-
Audience (who or what the token is intended for) (aud)
- List of audiences, will usually contain the API resource eg. openapi.
-
ClientID (client_id)
- The client id the token is issued to.
-
Scope (scope)
- List of scopes that the token is granted access to.
Web services
As a 3rd party developer, you have two (2) webservices to talk to.
-
The Identity Server
- Which handles all OAuth2 protocol communication
- Responsible for issuing your OAuth2 Access and Refresh tokens.
-
Exists at this address https://identity.mynuheat.com/
- Authorization endpoint: https://identity.mynuheat.com/connect/authorize
- Token endpoint: https://identity.mynuheat.com/connect/token
- See more details in Open ID Discovery well-known URL.
-
The OpenAPI
- The API you are reading about here and trying to access.
- Exists at this address https://api.mynuheat.com/
Block diagram of Architecture
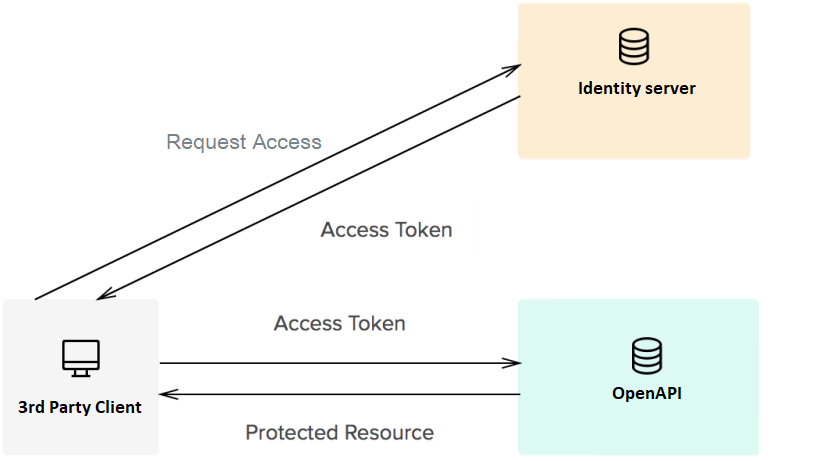
Authentication Code Scenario
Here is an example scenario showing the communication between the components

- During the inital part of the process, the user connects to the integrators service.
- The integrator's service then connects with the identity service to get authenticated.
- The end user then logs in with their credentials
- Then if successful, the integrator website/service then receives an authentication code on its redirecturl
- This authentication code can then be exchanged for an access token.

Once the integrator has an access token it is possible to access the Rest API endpoints and to make changes and get information from the protected resource.

- When Access tokens are received the Integrator also gets some information on when the token willl expire.
- When getting the orginial Access token, in the same call, the integrator also received a refresh token.
- A refresh token also has an expiry time, but it is generally much longer, e.g. 14 days from issue.
- The integrator can exchange the refresh token for a new access token and new refresh token.
- Using this method the integrator can gain indefinite access to the protected resource.
Implicit Grant Scenario
Here is an example scenario showing the communication between the components

- During the inital part of the process, the user connects to the integrators service.
- The integrator's service then connects with the identity service to get authenticated.
- The end user then logs in with their credentials
- Then if successful, the integrator website/service receives an access token on its redirecturl

Once the integrator has an access token it is possible to access the Rest API endpoints and to make changes and get information from the protected resource.
Http return codes
The Nuheat OpenAPI only supports json data. That means that it sends and receives the mimetype application/json.
Return codes
Success responses-
200- Success- Specifies that the request was a success, and that a there is data in the response body.
-
204- No Content- Specifies that the request was a success, but there is no data sent back in the response body.
- This is to save bandwidth.
-
400- Bad Request -
401- Unauthorized -
403- Forbidden -
404- Not found -
405- Method not allowed -
500- Internal server error -
501- Not implemented or not supported
The error codes are described more detailed in the error handling section.
Error handling
Error codes
All endpoints can send one of the following errors:
-
400- Bad Request- If what the client sent could not be validated.
-
401- Unauthorized- If the client is not authorized to call this method, eg. not logged in.
-
403- Forbidden- If the client doesn't have the scope for this call.
-
404- Not found- If a resource is being looked up that doesn't exist, or an endpoint that doesn't exists is being called.
-
405- Method not allowed- If a resource is blocked from accessing.
-
429- Too many requests- If you are hitting the burst and rate limits, you will receive this error code, see Burst and rate limits section.
-
500- Internal server error- If an unexpected error occured.
-
501- Not implemented- Feature not implemented or not supported
The following status codes [400, 500] will return a json response.
Error example
    {
    "messages": [
    "Description of the error that occured.",
    "Also this occured"
    ]
    }
Models
This section covers everything around the models and how they are related to eachother. Additional information on the models can be found on the swagger page, at the bottom of the page.
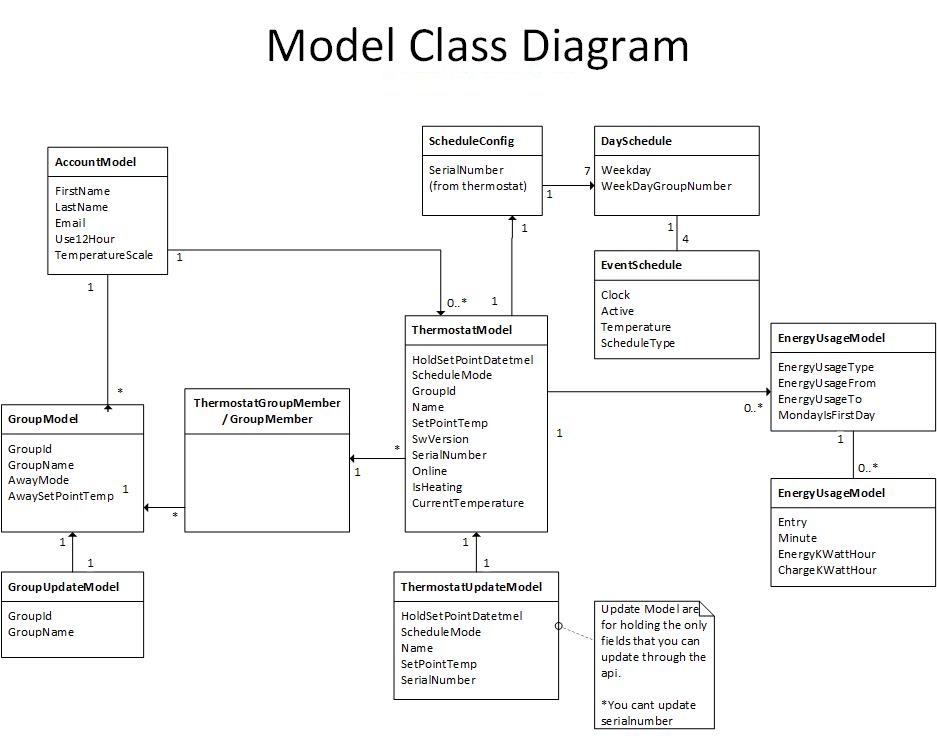
Diagram
All the models in the OpenApi are related to each other. With thermostat pointing towards a group id,
then there are more info on that specific group, when you do a GET request on that specific id.
Versioning
Multiple Version
The distributor OpenAPI supports multiple versions, which means that you as a developer, do not have to worry about
the release of new features or breaking changes.
New features added in the same API version will always be backwards
compatible and any breaking changes will be in a new major version of the API.
Version v1
Version v1, a complete version of the legacy Open API that contains endpoints for following models:
-
Account:
GET/api/v1/Account
-
Groups:
GET/api/v1/GroupGET/api/v1/Group/{groupId}PUT/api/v1/Group
-
Schedule:
GET/api/v1/ScheduleGET/api/v1/Schedule/{serialNumber}PUT/api/v1/Schedule
-
EnergyLog:
GET/api/v1/EnergyLog/Day/{serialNumber}/{date}GET/api/v1/EnergyLog/Week/{serialNumber}/{date}GET/api/v1/EnergyLog/Month/{serialNumber}/{year}
-
Thermostat:
GET/api/v1/ThermostatGET/api/v1/Thermostat/{serialNumber}PUT/api/v1/Thermostat
The
Schedule endpoints on the OpenAPI are disabled due to data incompatibility between API version v1 and v2. All Schedule endpoints return status HTTP 405: Method Not Allowed
Version v2
Version v2, a minimalistic version of Open API for new integrations with below models:
-
Account:
GET/api/v2/Account
-
Mode:
PUT/api/v2/Mode/AutoPUT/api/v2/Mode/HoldPUT/api/v2/Mode/Manual
-
Thermostat:
GET/api/v2/ThermostatGET/api/v2/Thermostat/{serialNumber}
Burst and Rate limits
Burst and rate limits have been implemented to avoid overuse by 3rd party applications. This has been implemented to stop a single client from being able to reduce the quality of service for the rest of the clients, whether it is by accident or on purpose.
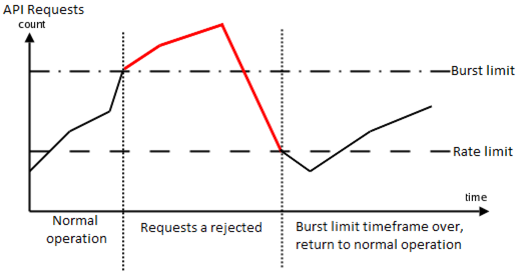
Burst and rate limits definition
-
Rate limits
- The overall "reasonable" allowed rate of calls to the API over a longer period. Usually defined in days and months. Eg. 250.000 in a month.
-
Burst limits
- The limit of allowed request in a short timeframe, usually defined in seconds or minutes.
Visual representation of burst and rate limits
Current limits
These limits are defined as a per user & per client basis. Which means a single user combined with a specific client id, has these specific limits. That means if a client ids user hits the limit, he is blocked out for the rest of that period, but it does not affect the other users of that client id.
| Per 10 seconds | 1,000 |
|---|---|
| Per 15 minutes | 10,000 |
| Per 12 hours | 100,000 |
| Per 7 days | 1,000,000 |
Http Responses:
When the rate limits are hit, the Nuheat OpenAPI will return HttpCode 429 - Too many requests.
If you hit the limit the response will be:
    Status Code: 429
    Retry-After: 58
    Content: API calls quota exceeded! maximum admitted 2 per 1m.
If the request doesn't get rate limited then the longest period defined in the rules is used to compose the X-Rate-Limit headers, these headers are injected in the response:
    X-Rate-Limit-Limit: the rate limit period (eg. 1m, 12h, 1d)
    X-Rate-Limit-Remaining: number of request remaining
    X-Rate-Limit-Reset: UTC date time (ISO 8601) when the limits resets
A client can parse the X-Rate-Limit-Reset like this:
DateTime resetDate = DateTime.ParseExact(resetHeader, "o", DateTimeFormatInfo.InvariantInfo);
Validation
A thermostat has two operating modes; Auto and Manual. In Auto mode, the thermostat uses its schedule to adjust the temperature during the day.
When the thermostat is set to Operating Mode Manual, the thermostats Schedule and ScheduleMode functionality is disabled, and only the SetPointTemp can be changed.
The Thermostat Updates from the API when in Manual mode function as usual, the ScheduleMode and HoldSetPointDateTime is ignored in this mode.
In this section we will cover how to use the different modes, and what input you should provide to get the expected result.
Thermostat Modes
Auto operation has 3 modes you can set the thermostat to:
- Auto
- Hold
- Permanent Hold
Mode: Auto
When usingScheduleMode:Auto the thermostat will use the schedule to define the temperature it should be set to.
In
ScheduleMode:Auto you do not have to set the SetPointTemp or HoldSetPointDateTime.
Since it does not use any of thise values it will ignore any input from them.
Example:
    {
    "serialNumber": "00000000",
    "setPointTemp": 0,
    "scheduleMode": 1,
    "holdSetPointDateTime": ""
    }
Mode: Hold
When usingScheduleMode:Hold, you temporarily set the temperature so it doesn't follow the current schedule.
In this mode you have to set the
SetPointTemp or it will try to use the last used value it had in this mode.
If the HoldSetPointDateTime is not supplied, it will default to the next schedule event. Once the HoldSetPointDateTime expires it will
return to ScheduleMode:Auto.
This functionality can be overwritten by supplying the
HoldSetPointDateTime with a specific date and time, as long as it is within the following 23 hours.
Example:
    {
    "serialNumber": "00000000",
    "setPointTemp": 3000,
    "scheduleMode": 2,
    "holdSetPointDateTime": "2018-10-03T19:00:00+00:00"
    }
Mode: Permanent Hold
In this mode the temperature is held indefinitely, the thermostat will not revert back toScheduleMode:Auto on its own.
you can spcify the
SetPointTemp to set the thermostats target temperature.
Example:
    {
    "serialNumber": "00000000",
    "setPointTemp": 3000,
    "scheduleMode": 3
    }
DateTime format
The required date and time format is ISO-8601 and its based on UTC. All timestamps must be in 24-hour format.
Formats
Date and timeyyyy-MM-ddTHH:mm:ssZDate
yyyy-MM-ddTime
HH:mm
Example:
Date and time:
2018-09-14T07:58:51Z
2018-09-14T09:58:51+02:00

Date:
2017-12-18
2018-09-14

Time:
11:05
23:30
Schedules
All schedule-related endpoints have been disabled on Open API v1. Any attempt to access schedule endpoints will result in an HTTP 405: Method Not Allowed response.
Affected endpoints are:
-
GET/api/v1/Schedule -
GET/api/v1/Schedule/{serialNumber} -
PUT/api/v1/Schedule
Energy log
The energylog endpoints supplies information about the estimated energy usage for a given period.
It tells the amount of minutes the thermostats heating relay has been on, in the given period of that energyUsage-entry.
Energylog data example
{
    "energyUsageType": "Day",
    "energyUsageFrom": "2018-09-25",
    "energyUsageTo": "2018-09-25",
    "mondayIsFirstDay": true,
    "energyUsage": [
        {
            "entry": "23",
            "minutes": 60,
            "energyKWattHour": 0,
            "chargeKWattHour": 0
        },
        {
            "entry": "22",
            "minutes": 13,
            "energyKWattHour": 0,
            "chargeKWattHour": 0
        },
        {
            "entry": "21",
            "minutes": 0,
            "energyKWattHour": 0,
            "chargeKWattHour": 0
        },
        ....
        {
            "entry": "2",
            "minutes": 0,
            "energyKWattHour": 0,
            "chargeKWattHour": 0
        },
        {
            "entry": "1",
            "minutes": 0,
            "energyKWattHour": 0,
            "chargeKWattHour": 0
        },
        {
            "entry": "0",
            "minutes": 0,
            "energyKWattHour": 0,
            "chargeKWattHour": 0
        }
    ]
}
There are three (3) energylog endpoints, and they are defined as:
Day
Lookup energylog for a single day. It will return the energy spent per individual hour of that day.
-
Input
- SerialNumber
- Date of the day you want to lookup energylog for.
-
Output
- Returns a list of entries for each hour of the day.
Week
Lookup energylog for a given week. It will return the energy spent per individual day of that week.
-
Input
- SerialNumber
- Date in the week you want to lookup energylog for.
-
Output
- Returns a list of entries for each day in the week.
Month
Lookup energylog for a given year. It will return the energy spent per individual month of that year.
-
Input
- SerialNumber
- The year you want to lookup energylog for.
-
Output
- Returns a list of entries for each month of that year.
Change Notifications
Change notifications functionality was implemented utilizing SignalR technology and should be used for minimizing an amount of requests to OpenAPI. Currently we support following notification types:
Version 1
Notification hub URL: /v1/changenotifications
| typeid | type | id |
|---|---|---|
| 1 | UserAccount | UserAccount id |
| 2 | Thermostat | Thermostat Serialnumber |
| 3 | Schedule | Thermostat Serialnumber |
| 4 | Group | Group id |
Version 2
Notification hub URL: /v2/notificationsHost
| typeid | type | id |
|---|---|---|
| 1 | UserAccount | UserAccount id |
| 2 | Thermostat | Thermostat Serialnumber |
Client side for handling notifications is technology agnostic, and some basic examples for creating SignalR clients can be found here.
Also need to remember that for authorization it is using OAuth2 and OpenID-Connect in the same way as OpenAPI.
Notification data example
[{"type":3,"id":"223414","timeStamp":"2018-10-04T11:51:27Z"}, {"type":2,"id":"223414","timeStamp":"2018-10-04T11:52:27Z"}]
Code example
The following plain JS/jQuery code sample shows how to create a simple SignalR client, establish connection and subscribe/unsubscripted for certain notification types. And for authorization it uses oidc-client-js library.
    var oidcConfig = {
    authority: authorityUrl, // OAuth2 authority url.
    client_id: "js", // client id that will be used for authorization.
    redirect_uri: redirectUrl, //Redirect url, should be matched with one defined for the specified client.
    response_type: "id_token token", //Authorization response type
    scope: "openid profile openapi", //Authorization scope
    automaticSilentRenew: true,
    filterProtocolClaims: true, nonce: "N" + Math.random() + "" + Date.now(),
    loadUserInfo: true
    };

    var manager = new Oidc.UserManager(oidcConfig)

    var token;
    manager.signinRedirectCallback().then(function (user) {
    console.log("signed in", user);
    token = user.access_token;
    }).catch(function (err) {
    console.log(err);
    });

    //Builds SignalR connection. SignalR connection hub is called  - "notificationsHost".
    //So full connection url should always be "baseUrl/notificationsHost".

    var connection = new signalR.HubConnectionBuilder().withUrl(baseUrl/notificationsHost+ "?token=" + token).build();

    //Start new connection.

    connection.start().then(() => {
    console.log('Connection started!');
    })
    .catch(err => console.error(err.toString()));
    });

    //Close connection.
    //If notification tracking is not needed anymore then connection should be closed, and it's safe to close connection without unsubscribing from what is currently tracking.

    connection.stop()
    .then(() => {
    console.log('Connection stopped!');
    })
    .catch(err => console.error(err.toString()));
    });

    //Subscribe for notifications after connections starts.

    var notificationTypes = ["1","2","3","4"]  //Subscribe for all kind of notifications.

    connection
    .invoke("Subscribe", notificationTypes).then(() => {
    console.log('Subscribed for notifications');
    })
    .catch(err => console.error(err.toString()));
    });

    //Unsubscribe from notifications. Please remember that amount of "unsubscribe" calls should be equal to amount of "subscribe" calls

    connection
    .invoke("Unsubscribe", notificationTypes).then(() => {
    console.log('Unsubscribed from notifications');
    })
    .catch(err => console.error(err.toString()));
    });

    //Handle notifications. The only callback that can be invoked on the client side is called - "Notify".

    connection.on("Notify", (value) => {
    traceNotification(value);
    });

    function traceNotification(notificationList) {
    notificationList.forEach(function (notification) {
    var notificationType = "";
    switch (notification.type) {
    case 0:
    notificationType = "UserAccount";
    break;
    case 1:
    notificationType = "UserAccount";
    break;
    case 2:
    notificationType = "Thermostat";
    break;
    case 3:
    notificationType = "Schedule";
    break;
    case 4:
    notificationType = "Group";
    break;
    }
    var traceMessage =
    notificationType + ' notification for item ' + notification.id + " at " + notification.timeStamp;
    console.log(traceMessage);
    });
    }